WEBSITE DEPLOYMENT ON GCP
By Yassine – March 8, 2025
I recently deployed my personal website on Google Cloud Platform! In this guide, I’ll walk you through how I hosted my website on Google Cloud Platform (GCP) using services like Cloud Storage, Cloud Run, Cloud DNS, and Load Balancer.
Deploying my website on the cloud involved working with several key tools:
- Cloud Storage – Hosts and serves static content (HTML, CSS, JS, images).
- Cloud Run – Host the Flask application in a docker container.
- Cloud DNS & Load Balancer – Associates the website with a domain and a public IP for accessibility.
Prerequisites
Before we dive in, here’s what you’ll need to get or install:
- A Google Cloud Platform account.
- A domain name purchased from a domain provider.
- Google Cloud SDK installed on your machine to interact with GCP via CLI.
Hosting a Static Website on Cloud Storage
Cloud Storage is a scalable and secure object storage service by Google Cloud, ideal for hosting static websites. To store your files on Cloud Storage, you need to create and configure a bucket, which serves as a cost-effective container for your data.
Create a Bucket
Enter the command below on cloud Shell to create a bucket:
gcloud storage buckets create gs://YOUR_BUCKET_NAME --location=REGION
Replace REGION with your desired region and YOUR_BUCKET_NAME with the name of your bucket.
You can find the list of all regions here.
Now that the bucket is created, you can access it in Cloud Storage.
Load Files
To load your files from your local computer to your Cloud Storage bucket, enter one of these commands below:
Copy one file:
gcloud storage cp File.txt gs://YOUR_BUCKET_NAME/
Copy two or more files:
gcloud storage cp File1.txt File2.txt gs://YOUR_BUCKET_NAME/
Copy a folder:
gcloud storage cp -r MY-FOLDER gs://YOUR_BUCKET_NAME/
Set Public Access
To allow users to access your website, you must make the files in the bucket public.
Enter the command below to set your bucket public:
                    gcloud storage objects add-iam-policy-binding gs://YOUR_BUCKET_NAME \

                    --member=allUsers \

                    --role=roles/storage.objectViewer
Replace YOUR_BUCKET_NAME with your actual bucket name.
This grants public read access (roles/storage.objectViewer) to all objects within the bucket, allowing anyone to view them.
Set Default Homepage
gcloud storage buckets update gs://YOUR_BUCKET_NAME --web-main-page-suffix index.html
Replace YOUR_BUCKET_NAME with your actual bucket name.
Replace index.html with the path of your homepage.
This command will set index.html as the default homepage when users access the site via a browser.
Configuring Load Balancing
The load balancer connects the backend to the frontend of an application. In this case, I will link my website, which serves as the backend, to the domain, which acts as the frontend.
Navigate to Load Balancing and create a load balancer.
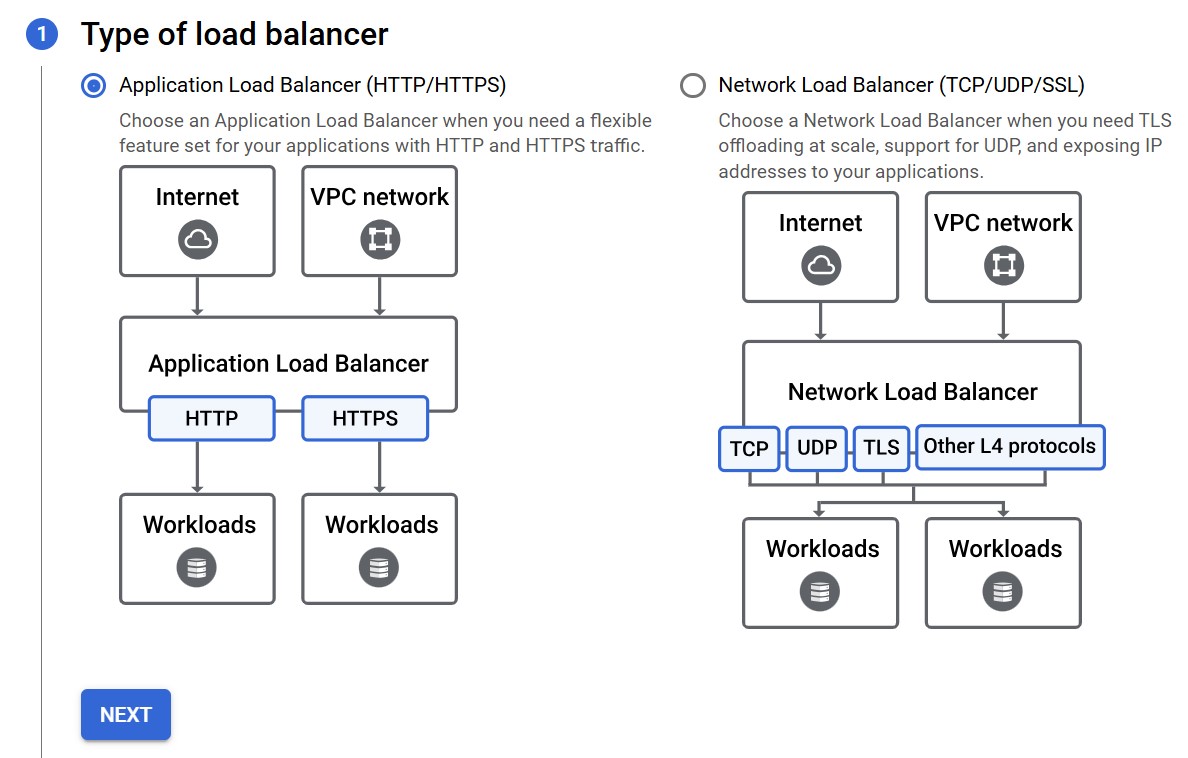

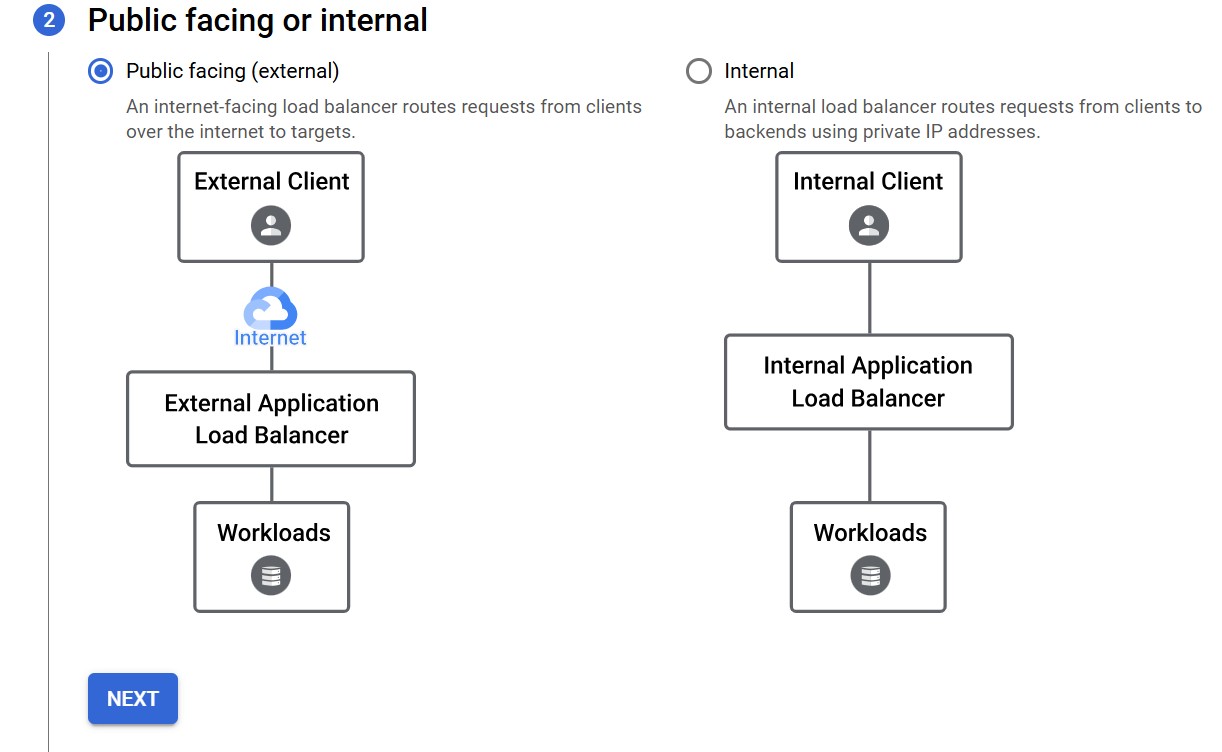
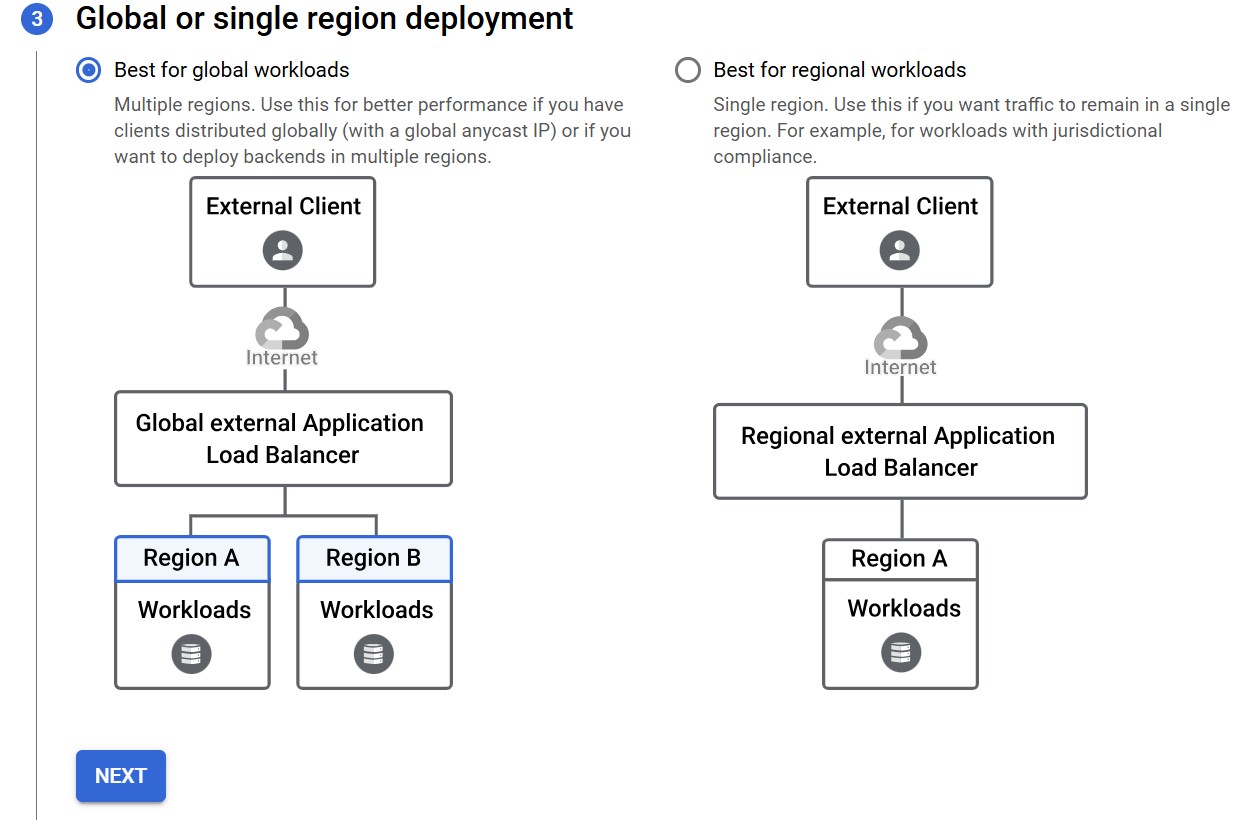
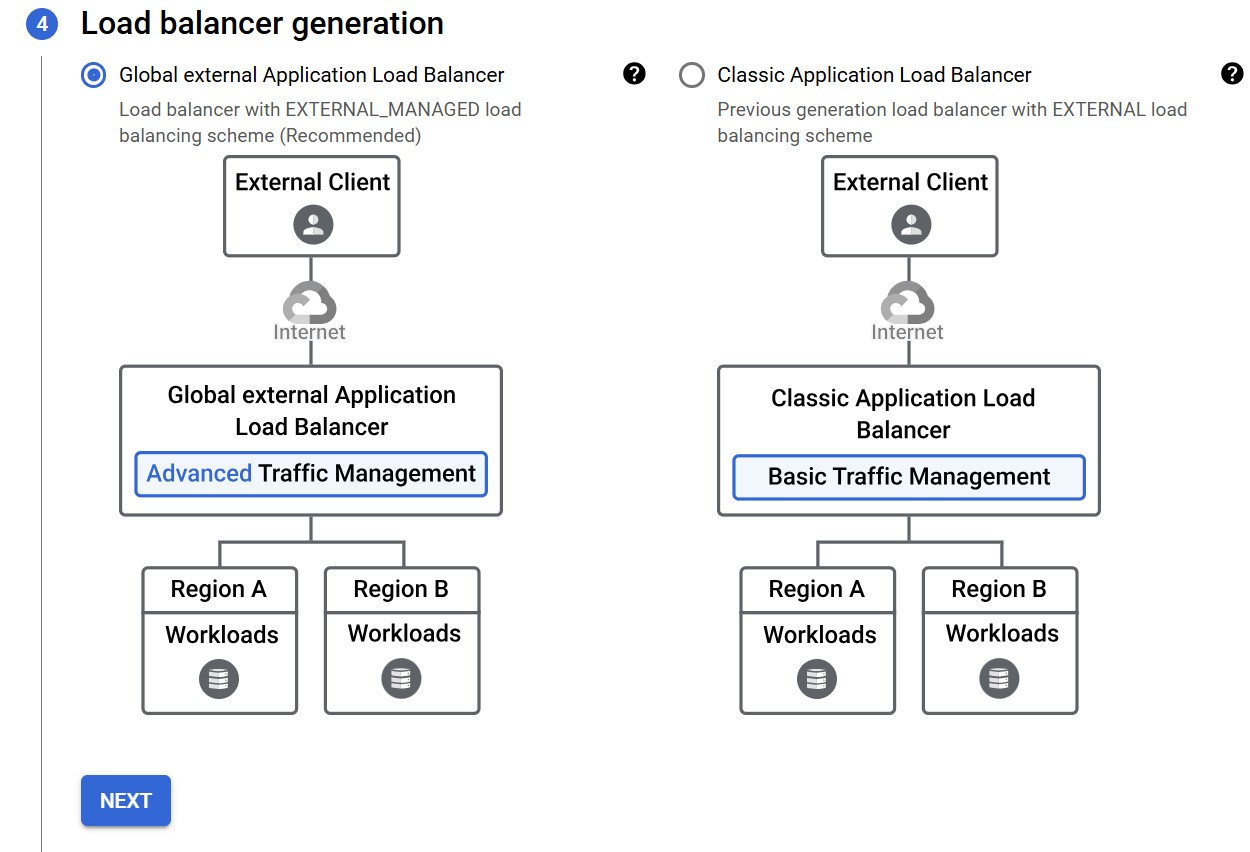
For the next steps, you need to configure the frontend, backend and routing rules.
Set Frontend
In the frontend, you have the choice between the HTTP and HTTPS protocols. However, most browsers restrict access to HTTP due to security concerns. Therefore, it is recommended to use HTTPS for better accessibility and security.
To enable HTTPS, you need a static IP address and an SSL certificate associated with your domain name.
Create an external static IP address:
gcloud compute addresses create ADDRESS-NAME --global
Replace ADRESS-NAME by the name you want to give to your IP address.
Steps to create a new frontend IP and port:
- Click on "ADD FRONTEND IP AND PORT".
- Set the protocol to HTTPS.
- Choose the IP address you just created.
- Create an SSL Certificate:
- Select "Create Google-managed certificate".
- Enter your domain twice:
example.comwww.example.com
- Click "Create" to generate the certificate.

Set Backend
To configure the backend, you need to link your Cloud Storage bucket.
- Click on "CREATE A BACKEND BUCKET".
- Select the bucket you created where your website files are stored.
- Decide whether to enable Cloud CDN for caching and performance optimization.
Cloud CDN stores cached copies of your website in multiple data centers worldwide, reducing loading time and lowering request costs.
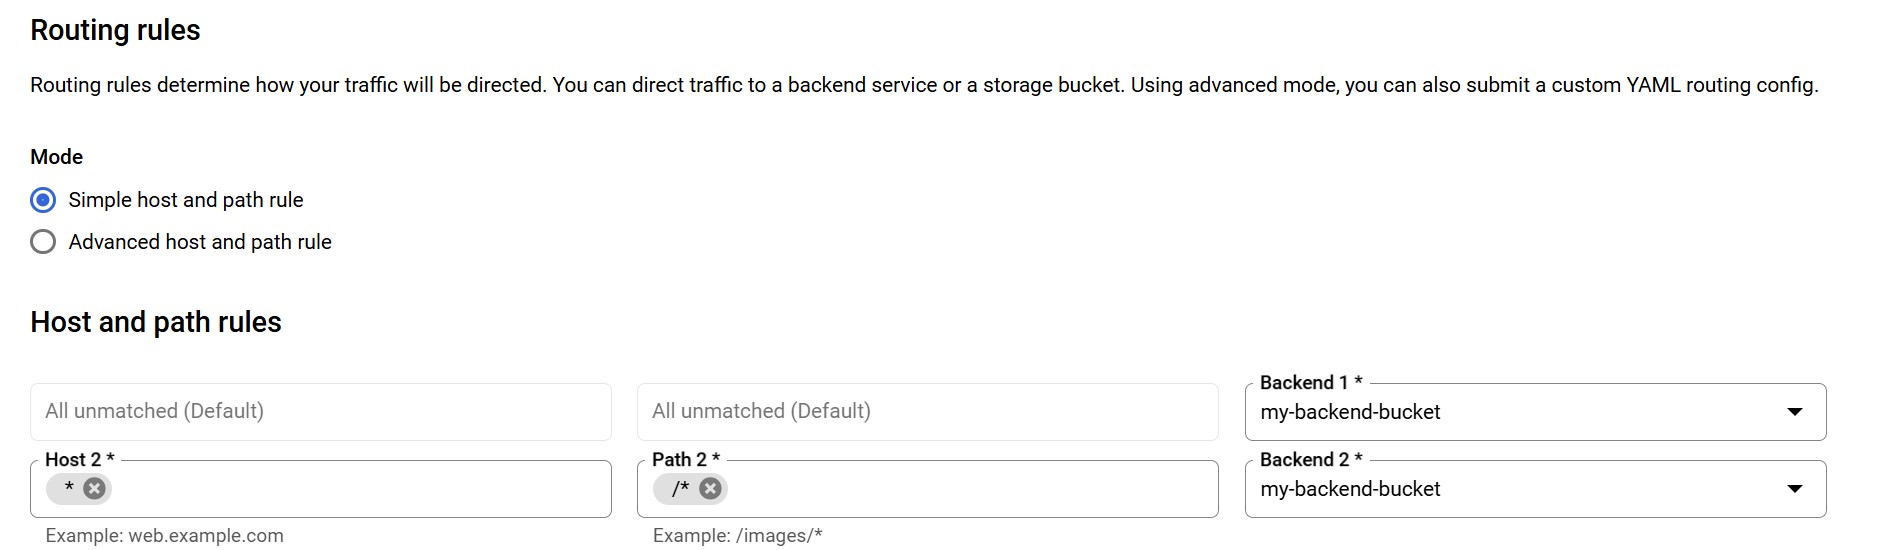
Routing Rules
The routing rules configuration determines how incoming traffic is directed to the backend. By setting the host to '*', any request from any domain associated with the external IP address of the load balancer will be accepted and routed to the storage bucket.
This means that if multiple domains are linked to the same external IP via DNS, they will all be able to access the website stored in the bucket. If you want to restrict access to a specific domain, you should replace '*' with your domain name to ensure that only requests from that domain are allowed.
The load balancer configuration is now complete. You can access your website using the external IP address. To find your external IP, click on the name of your load balancer.
Next, you need to connect your domain to the external IP address by updating your DNS settings.
Transferring a Domain to GCP with Cloud DNS
There are many domain name providers available on the market. I purchased mine from GoDaddy. If your domain is registered outside of GCP, you have two options to link it to an IP address hosted on GCP: you can either manage your DNS settings directly through your domain provider or transfer the DNS management to GCP using Cloud DNS.
Transferring DNS management to GCP offers several advantages, including improved integration with other Google Cloud services, better performance through Google's global network, and centralized management within the GCP console. This simplifies domain configurations, enhances security, and provides more flexibility for scaling and automation.
In our case, we will follow a step-by-step process to transfer DNS management from godaddy to GCP.
Setting Cloud DNS
Steps to Set Up Cloud DNS:
- Navigate to Cloud DNS.
- Click on Create a Zone to start configuring your domain's DNS settings.
- Choose Public as the zone type, since the domain will be publicly accessible.
- Click Create to generate the DNS zone.
Once the zone is created, you can add DNS records to connect your domain to the load balancer's external IP.
To correctly configure your DNS, you need to add two records: an A record and a CNAME record.
A Record : Connects your domain name to the external IP address of your load balancer.
yassinelaghrabli.com → 31.211.33.102
CNAME Record : Creates a nickname for your domain by adding 'www.' in front of it.
www.yassinelaghrabli.com → yassinelaghrabli.com
This ensures that when users type 'example.com', they are directed to your website and if someone types 'www.example.com', it will automatically point to 'example.com' meaning that it will redirected to the website. These two records ensure that your website is accessible both with and without the 'www' prefix.
www.yassinelaghrabli.com → yassinelaghrabli.com → 31.211.33.102
To add these records, follow these steps, go to the DNS zone you just created.
Adding the A Record
- Click on "Add Standard" to create a new record.
- For Resource Record Type, select A.
- In the IPv4 Address field, paste your load balancer's external IP address.
- Click Create to save the record.
Adding the CNAME Record
- Click "Add Standard" again to create another record.
- For Resource Record Type, select CNAME.
- In the DNS Name field, enter 'www' to create www.example.com.
- In the Canonical Name field, enter your domain name (example.com).
- Click Create to save the record.
Transfer Domain Management
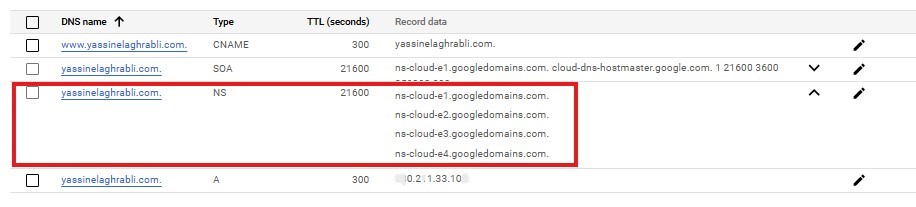
After purchasing your domain on GoDaddy, go to My Products, select your domain, and access the DNS settings. Then, navigate to the Name Servers section.


To find your name servers, go to Cloud DNS. and select the DNS zone you just created. Look for the NS record, which contains your name servers. You'll need to copy and paste the four addresses, as shown in the following images.
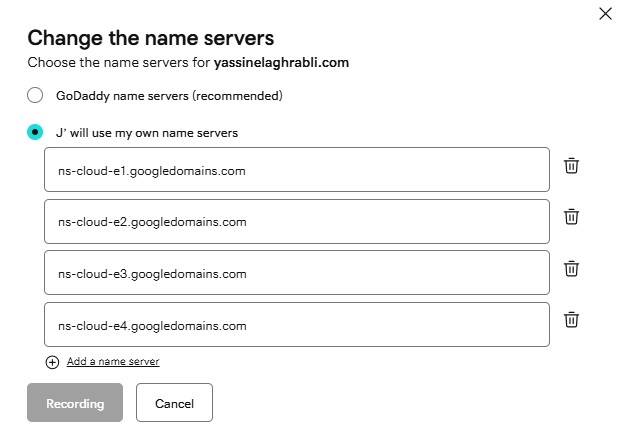
After setting the name servers in your domain provider, it may take anywhere from a few minutes to some hours for the changes to propagate and transfer management to Cloud DNS. Once the redirection is complete, you will be able to access your website using your domain name.
Flask API Deployment with Cloud Run
In this section, I'll walk through the steps to deploy a Flask application on Cloud Run.
To optimize resource usage, I decided to package my application in a Docker container before deploying it. This approach enhances portability and simplifies dependency management.
Before we dive into the deployment process, here's the project folder I build for my application.
                    app

                    │── myPackages

                    │── venv

                    │── .dockerignore

                    │── .env

                    │── app.py

                    │── Dockerfile

                    │── requirements.txt
myPackage – Folder that contains all the Python packages built for your Flask application.
venv – This is your Python development environment; you don't include it in your Docker image.
.env – Contains all sensitive information (credentials, API keys, etc.).
.dockerignore – Contains all the files and folders you don't want to include in your Docker image (like venv).
app.py – The Python application I built to automate email sending using the form I set up on https://yassinelaghrabli.com/dataengineer.
Dockerfile – The file that defines the Docker image for the application. It includes all the instructions needed to install dependencies and the commands to start the server.
                    FROM python:3.9.17-bookworm


                    ENV PYTHONUNBUFFERED True


                    ENV APP_HOME /back-end

                    WORKDIR $APP_HOME

                    COPY . ./


                    RUN pip install --no-cache-dir --upgrade pip

                    RUN pip install --no-cache-dir -r requirements.txt


                    CMD exec gunicorn --bind :$PORT --workers 1 --threads 0 --timeout 15 app:app
This Dockerfile sets up a containerized environment for a Python backend. It starts by using a Python 3.9 image, sets an environment variable to disable output buffering, and defines the working directory. It then copies all project files into the container, upgrades pip, and installs the required dependencies. Finally, it launches the application using Gunicorn, binding it to a specified port.
- --workers 1 → There is only one Gunicorn process running my application, meaning only one request is processed at a time.
- --threads 2 → Gunicorn can create maximum 2 threads meaning 2 parallel requests can be handled.
- --timeout 15 → There is a time limit of 15 seconds for requests, so a request can be interrupted if it take more than 15 seconds.
requirements.txt – Contains all the Python libraries needed to run the application correctly.
Container Deployment
To install the container on Cloud Run from a folder in your desktop, you need to install the Google Cloud CLI.
After installing the Google Cloud CLI, launch the command gcloud init to connect to your Google account.
Once the configuration is complete, you can run the following command to install and start your Docker container.
gcloud run deploy --source .
After the command runs successfully, you can find your container on Cloud Run.
Link the application with a domain name
The goal is to access your application using a domain name. You don’t need to purchase a new one; you can simply customize the one you already use for your website.
To access the website, you use: yassinelaghrabli.com or www.yassinelaghrabli.com
Now to access to Flask application, you will use: api.yassinelaghrabli.com
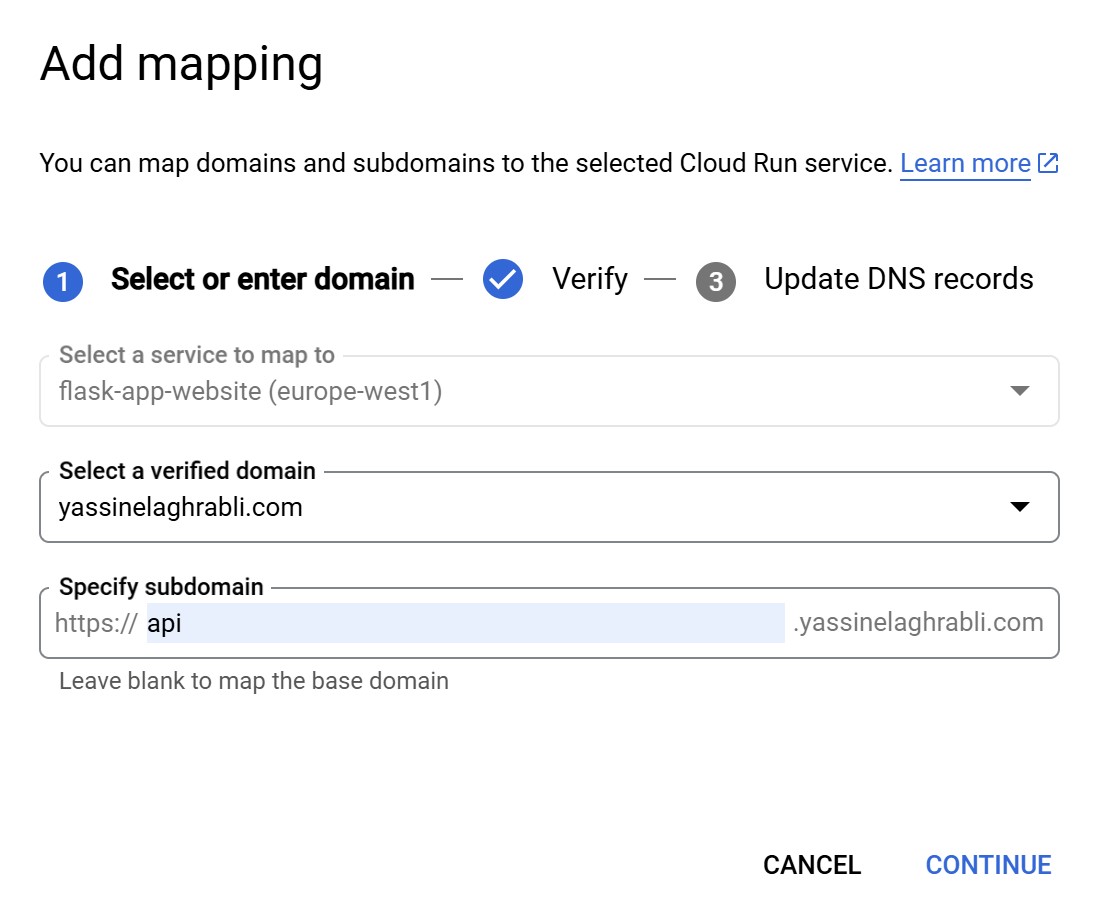
To link your Flask application to a domain, navigate to the Domain Mapping.
- click on "ADD MAPPING".
- Select your Cloud Run service from the list.
- Enter your custom domain (api.yassinelaghrabli.com).
- Click "Continue" and follow the instructions to verify domain ownership.
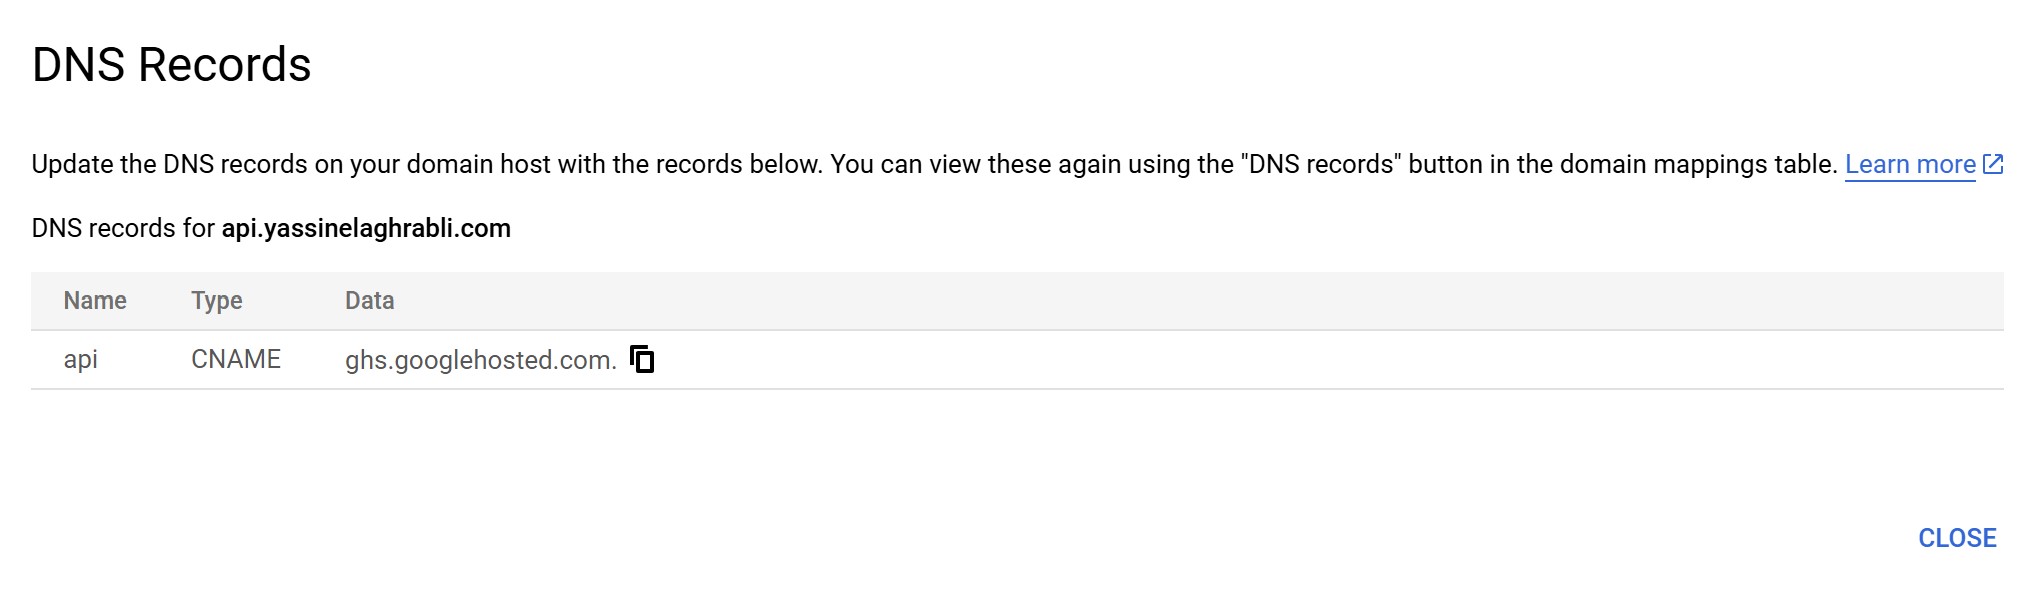
- Add the DNS records to your Cloud DNS..
- After few minutes, your domain will be linked to your Flask application.
You can access my Flask application on my GITHUB.
By following these steps, you have successfully deployed your static website on Google Cloud Storage and linked it to a custom domain. Additionally, you have configured a Flask application on Cloud Run and connected it to a subdomain, allowing seamless integration between your website and backend services.